Fork a project
In this section you to learn how to fork a project, and get it up and running in your own Quix account.
Once you have the project running in your Quix account, you can modify the project as required, and save your changes to your copy of the project.
With a fork of the repository, you can also receive upstream bug fixes and improvements if you want to, by syncing your fork with the upstream repository.
In the following sections you learn how to:
- Fork an existing project repository.
- Create a new project (and environment) in Quix, linked to your forked repository.
Watch a video
This video shows you how to fork a template project and create your project in Quix:
Transcript
00:01 Hi, welcome to Quicks. In this video, I will show you how to set up the computer vision tutorial. You can find that in the tutorials section of documentation.
00:17 The computer vision tutorial is one of two tutorials currently that use what we call project templates or template projects. And these are essentially GitHub, public GitHub repos that you can use to quickly build your own project and get it up and running in Quix.
00:40 So it's probably easiest just to take you through it and show you how it all works. If you're fairly new to Quix then I would recommend that you start with something a lot less complicated such as the Quix start or possibly the Quix tour.
00:59 The Quix start you'll start to see how to get data into Quix and how to start building out a pipeline.
01:07 In the Quix tour you'll see how to complete the construction of that pipeline. With template projects what you're doing is you're importing the entire pipeline in one go from a public repo and there's usually a lot more services and things going on there so there's just more to configure and more to
01:30 deal with. So anyway in this video I will take a look at the computer vision tutorial. And just show you how to set up that project.
01:41 So the first thing to say about this is, as I've mentioned, it is a template. It's based on a tutorial.
01:49 It's based on a template project. So that is essentially a public repository in Quix. So if I go to the Quix GitHub site, you can see all our repositories there and the one we're looking for is computer vision demo.
02:14 And the way that you work with these is you fork them into your own GitHub or you might have another provider like Mercurial.
02:25 For example, GitLab, but you'll fork the project, this public project into your own GitHub account. So I have a Git account here on GitHub and I'm going to fork this public repo into here and then I'm going to connect Quix to my repo.
02:50 So let's start by forking repo. Now the main thing that you need to do here is you you're going to need all the branches.
03:03 So make sure you clear this checkbox here. We're going to be working primarily with the tutorial branch and we'll also be creating a feature branch.
03:14 Creating some new features there and then merging that back into the tutorial branch later in the tutorial. I'm going to focus in this video on just getting you set up and getting you configured.
03:26 So let's go ahead and create the fork. So after a moment, the fork is created. You can see here, it's my GitHub account, my test GitHub.
03:46 And then the project is here and we have all the branches and the one that I mentioned that we want to work with is the tutorial branch.
03:59 Okay, so let's go back to Quicks. Now you possibly already have a project in your in your organization overview from when you onboarded, when you signed up, you might have created a, a, a, a, a, a, a, a, a, a, a, a simple project.
04:22 But what I recommend is you create a new project. And the reason that I suggest that is because we're going to be linking to our external repository.
04:30 So let's do that now. Let's give the project a name. I'm just going to call it computer vision. And in some projects you you do want Quix to just handle the git side of things for you.
04:51 But in this case, because we're connecting to a template project, we're going to, well, going to be using a template project, we're going to connect to our own GitHub repository.
05:04 So we have to go here and choose connect to your own. Get repo. Now the repo that I'm connecting to is just refresh that is, is this one.
05:18 So if I go into here, I can get the, the. URL for this and just copy that and then go back to here and put this in here like that.
05:36 Then Quix gives you. And a public an SSH public key, which we're going to need to use to allow Quix to connect to our GitHub account.
05:50 So I copy that to the clipboard and then I'm going to do. Is go back to my get accounts. I'll go into settings and then SSH keys, create a new SSH key called computer vision.
06:11 Oops, can't type today and then paste in that and add that key in. So that's now there in my account.
06:29 Then what I'm going to do is go back to, I need to go back to here, and I'm going to validate my connection, so, okay.
06:44 Validate. This is validated, so I have my URL, I have my public keys now in my GitHub account, and I can click done on that, and then I can go ahead and create the project.
07:00 Now, a project you can think of as connecting to a Git repository, but each project has one or more environment, and the environment roughly corresponds to a branch, but also to certain storage and streaming service facilities that you can have.
07:22 So let's step through creating the environment, because you, every project has to have at least one environment. So I'm going to call my environment tutorial.
07:32 And I will select the branch here. And I'm not going to make this a protected branch and the reason is we're going to need to configure certain API keys and that kind of thing.
07:48 So we'll see that in a minute. So the environment name is tutorial and that corresponds to the tutorial branch which I've selected here and that was just one of the many branches in the GitHub repay that we cloned or, sorry, forked.
08:04 So let's continue now. For the purposes of the tutorial we can just use the Quix broker. You don't, I mean you could connect to something like Red Panda or Confluent Cloud, but we'll just get Quix to host Kafka for you.
08:20 It works because that's really, really simple to do. So just click continue. Then you have a choice between standard data and string services and high performance.
08:33 And here, if you were looking at some kind of really heavy duty production environment, you will almost certainly need to go for the high performance option.
08:43 If you find that certain services, these are referenced in documentation, but if you find that certain services are slowing down, then you probably need to upgrade to the high performance option.
08:59 But for the tutorial, we can just use the standard option. So let's create the environment. So I will pause the video.
09:09 At this point while the environment is created and then we'll take a look at the environment. Okay, so the tutorial environment is created so we can go in here and have a look at this.
09:26 And you can see kind of our pipeline is almost ready to go, but what we're going to need to do is we're going to need to sync this environment up.
09:39 So what's, what this is really saying is that what we're seeing in Quix at the moment is different to what we have in the repository that this is connected to.
09:56 So we need to sync it up. We need to synchronize and make them the same and we can just do that by clicking the sync button and this is going to, I mean this is covered in other documentation, but essentially this is going to bring in the configuration.
10:13 And the things that we need to make our Quix environment the same as what's in the GitHub repo. So I'll just go ahead and sync the environment and that's okay so we can go to the pipeline.
10:29 And you'll see that everything is now kind of starting to build itself and what I'll do, you can see all the services here, transforms destination and this is the source here.
10:46 Color coded. It's creating topics. You can see messages here. What I will do is pause the video and then come back to you again while that's creating.
10:58 So see you in a minute. Okay, so everything is building and running fine. The object detection service is still building.
11:18 We notice a slight problem here. If we look at the camera feed, then what's happening is it's starting and then we're getting a runtime error and you can see that it's restarted three times already.
11:30 If you look here, this means it's had three restarts. So if, if I have out here for a second, this should give me a runtime error.
11:45 Now, we can, yeah, there you go. So runtime error. We can look at this service in a bit more detail and we can see what the problem is straight away.
11:57 And that is that we're missing the TFL API key. So I'll stop, stop the video. So at this point and in the next video I will show you how to fix this and get this working.
12:15 Okay thank you, see you in the next video.
Note, this is for the computer vision template project, but the process is the same.
Fork the project repository
Quix provides the template project as a public GitHub repository.
Tip
Search the Quix GitHub repositories for projects with template in them, or see the project gallery.
If you want to use this template as a starting point for your own project, then you can fork the project.
Using fork enables you to create a complete copy of the project, but also benefit from future bug fixes and improvements by using the upstream changes.
To fork the repository:
-
Navigate to the template's GitHub repository.
-
Click the
Forkbutton to fork the repo into your GitHub account (or equivalent Git provider if you don't have a GitHub account).Important
With template repositories, by default the
tutorialbranch is selected for you when you fork. If not, make sure you deselect thefork main onlycheckbox, so you fork all branches, as thetutorialbranch is desgined to work with the free Quix account.
Tip
If you don't have GitHub account you can use another Git provider, such as GitLab or Bitbucket. If using Bitbucket, for example, you could import the repository - this would act as a clone (a static snapshot) of the repository. This is a simple option for Bitbucket, but you would not receive upstream changes from the original repository once the repository has been imported. You would however have a copy of the project you could then modify to suit your use case. Other providers support other options, check the documentation for your Git provider.
Create your Quix project
Now that you have a forked copy of the repository in your GitHub account, you can now link your Quix account to it. Doing this enables you to build and deploy the project in your Quix account, and examine the pipeline much more closely.
To link Quix to this forked repository:
-
Log into your Quix account.
-
Click
+ Create project. -
Give your project a name. For example, "My Project".
-
Select
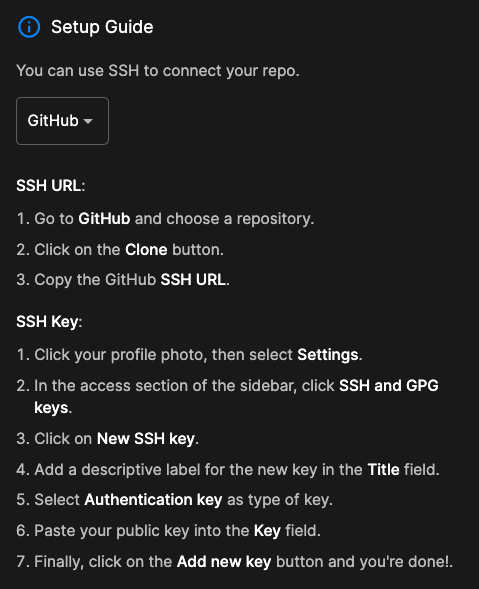
Connect to your own Git repo, and follow the setup guide for your provider.Tip
A setup guide is provided for each of the common Git providers. Other Git providers are supported, as long as they support SSH keys.
The setup guide for GitHub is shown here:
-
Assuming you are connecting to a GitHub account, you'll now need to copy the SSH key provided by Quix into your GitHub account. See the setup guide for further details.
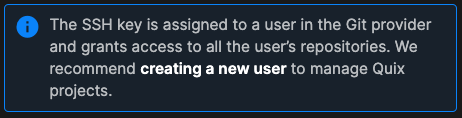
Important
It is recommended that you create a new user in your Git provider for managing your Quix projects. You are reminded of this when you create a project (the notice is shown in the following screenshot).
-
Click
Validateto test the connection between Quix and GitHub.Tip
If errors occur you need to address them before continuing. For example, make sure you have the correct link to the repository, and you have have added the provided SSH key to your provider account, as outlined in the setup guide for that provider.
-
Click
Doneto proceed.
You now need to add an environment to your project. This is explained in the following section.
Create your environment
You now need to create an environment. See the create environment documentation for details.
Configure secrets
You'll need to create any secrets the project requires, for example, for external services such as InfluxDB Cloud.
Once you've added your secrets, you can Synchronize and then go to the completed pipeline and monitor all services as they start.