How to build a no-code pipeline for sentiment analysis with our Snowflake connector
Three Quix connectors let you move data from Twitter to a Snowflake database while transforming it along the way. Learn how to set up the pipeline without writing any code.


Spend less time integrating, and more time building
Connectors in the Quix library are quick and easy ways of integrating with other platforms. They’re pre-built to cut down on development time while remaining customizable, so you can build precisely what you want in a fraction of the time. Connectors also allow users to split their data processing pipeline into discrete microservices and manage all of them in the Quix platform. Building data stacks with microservices mean modularity and scalability for your product. You might want to swap tools or expand your product down the line. It allows you to exchange sources, transformations and destinations over time without rebuilding from scratch.
This tutorial will show you how to build a simple but complete data processing pipeline from scratch without touching any code. We’ll analyze tweets that contain information about Bitcoin and stream both raw and transformed data into Snowflake, a storage platform, using the Twitter, HuggingFace and Snowflake connectors. The pipeline you build will stream time-series, parameter data and metadata from Twitter to Snowflake — all managed from inside Quix.
I’ve made a video of this tutorial if you prefer watching to reading.
What you need for this tutorial
- Free Quix account
- Snowflake account
- Twitter developer account (You can follow this tutorial to set up a developer account.)
Step one: create a database
Sign in to your Snowflake account to create the Snowflake database to receive your data. Call this “demo data” and click “Create.” Snowflake will do the rest. You probably won’t see the database immediately, but it’ll be ready when you need it later.
Step two: get your data
In Quix, click into the library and search for the Twitter source connector. Click “Add new,” which adds the source to your pipeline and brings you back to the library.
You’ll notice that we need to fill in a few details for the connector to be deployed. Leave the output with the default value of “twitter-data.” If it isn’t pre-filled, make sure it is set to “twitter-data.”
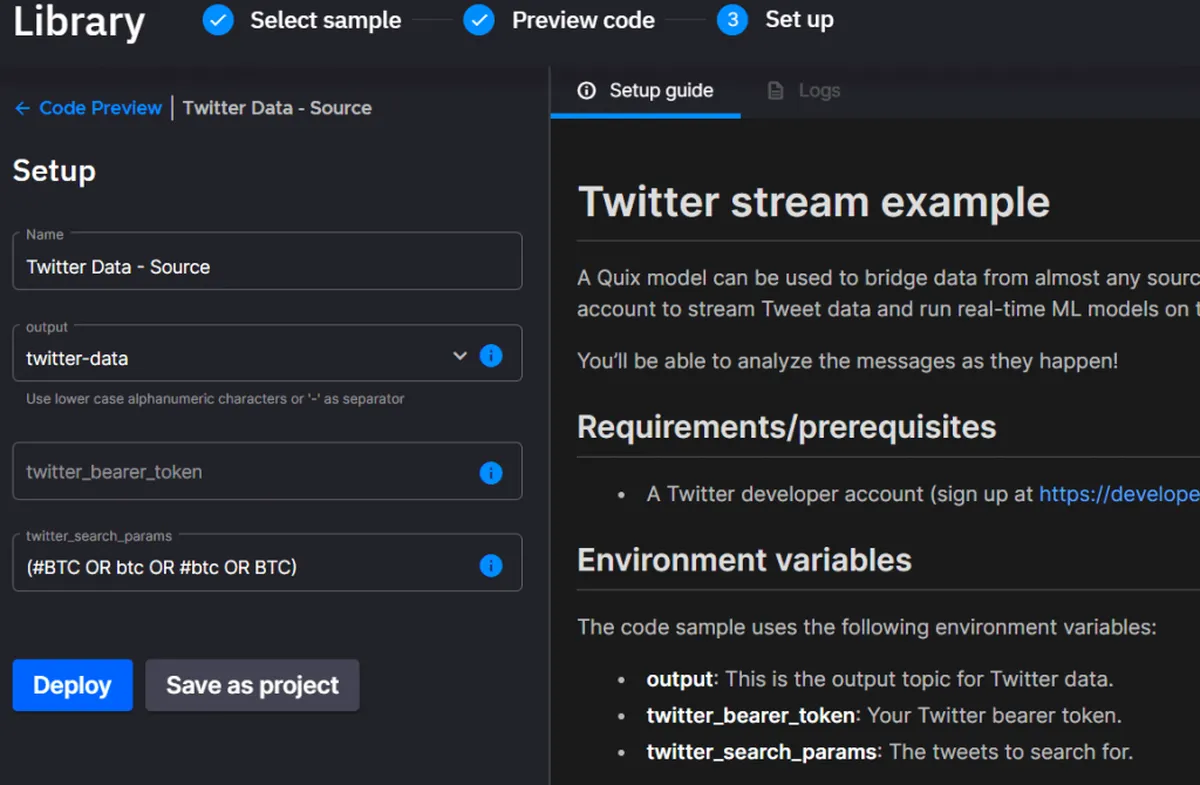
Fill in your Twitter bearer token and search parameters. We’re using tweets as our data source, and we’ll listen specifically to Bitcoin tweets because of their high volume and would benefit from real-time processing. But you could change that to any search parameter.
Paste your Twitter Dev token and click “Deploy.” This deploys the pre-built Twitter connector. You’ll see that you already have some log output and the green dot that shows it’s running.
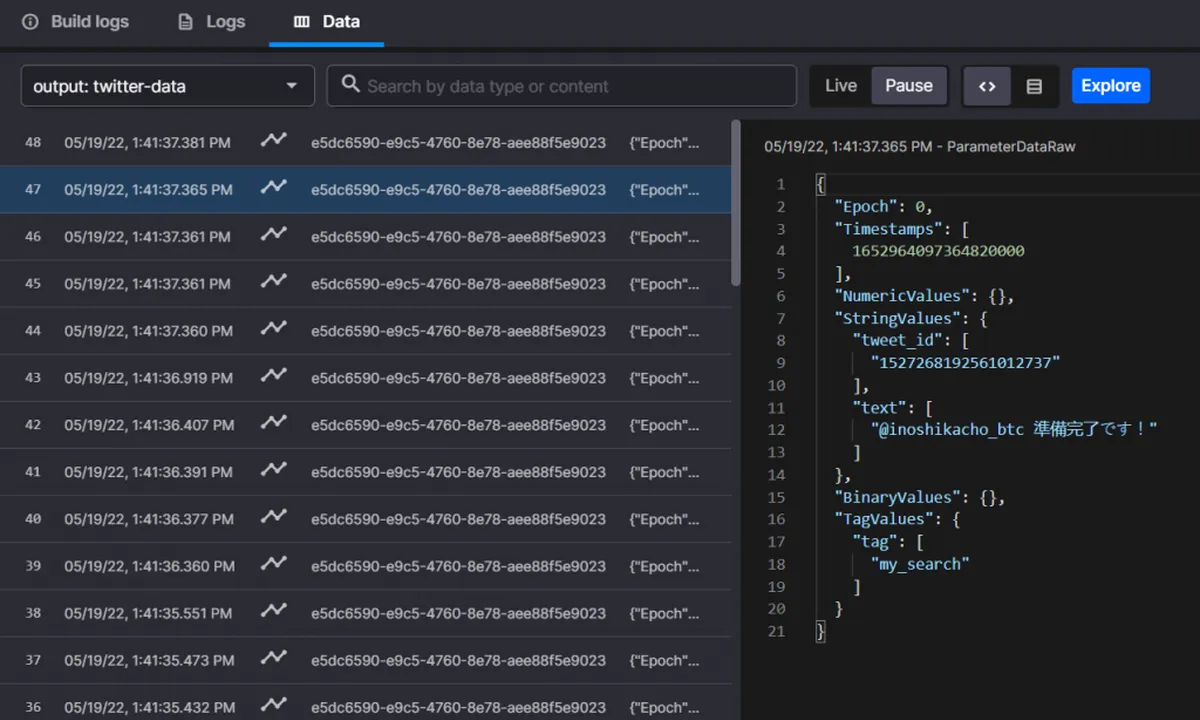
Step three: investigate the logs
To investigate the logs and look at your data, click on the Twitter connector tile on the home page. You can see that the tweets are being written into a stream in real time. You can see in the table view the string values, the tweet ID and the text.
Step four: transformation for sentiment analysis
In this step, you’ll do sentiment analysis on the tweets. Return to your workspace in Quix and click the “Add transformation” button. In the library, search for “HuggingFace.” We’ll use a HuggingFace model to determine sentiment analysis.
Click “Set up and deploy.” Choose “Twitter data” as the input topic. This is the raw data coming from Twitter. Set your output topic to hugging-face-output and use the default model. Leave all other values with their defaults.
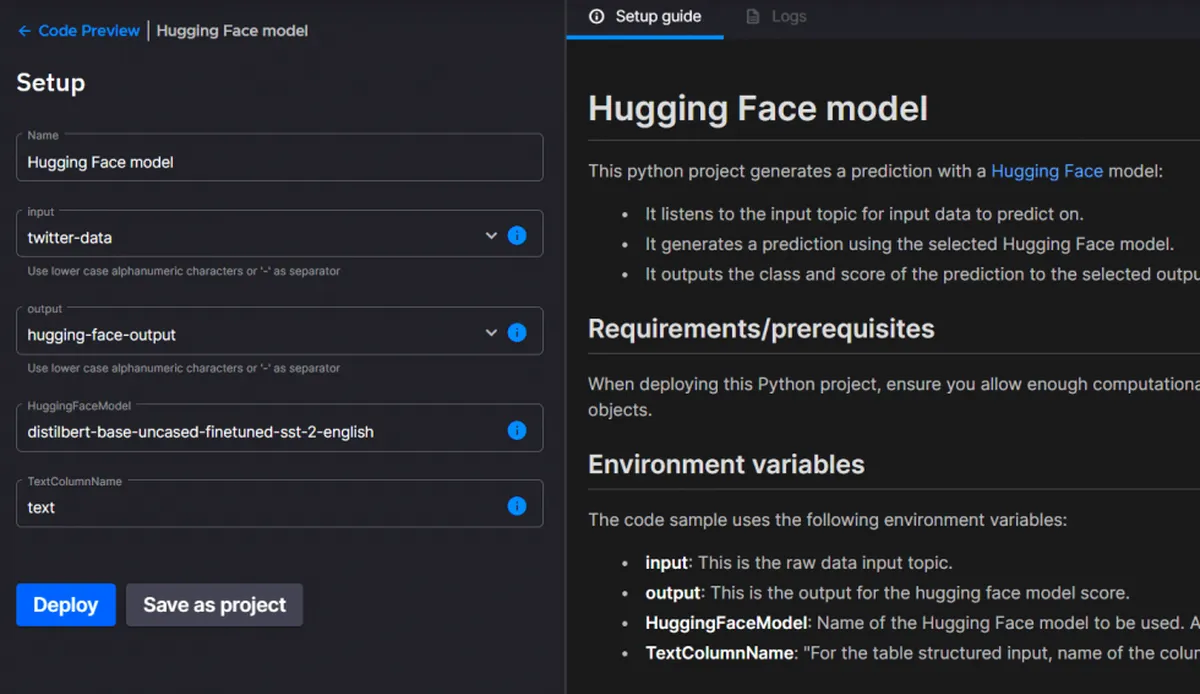
Click “Deploy.” The pre-built connector will deploy on the Quix platform, and you’ll see the output shortly. You’ll be redirected to the home page to see that you now have two deployments up and running: the Twitter data source and the HuggingFace model.
Step five: delivery
In this step, you’ll deploy the Slowflake connector, which will stream the results of the HuggingFace model into your Snowflake database.
Click the “Add destination” button and search the library for the Snowflake connector.
Click “Set up and deploy” on the connector. You’ll need to fill in a few items here. Choose the hugging-face-output output topic, which will be the feed for this Snowflake sync.
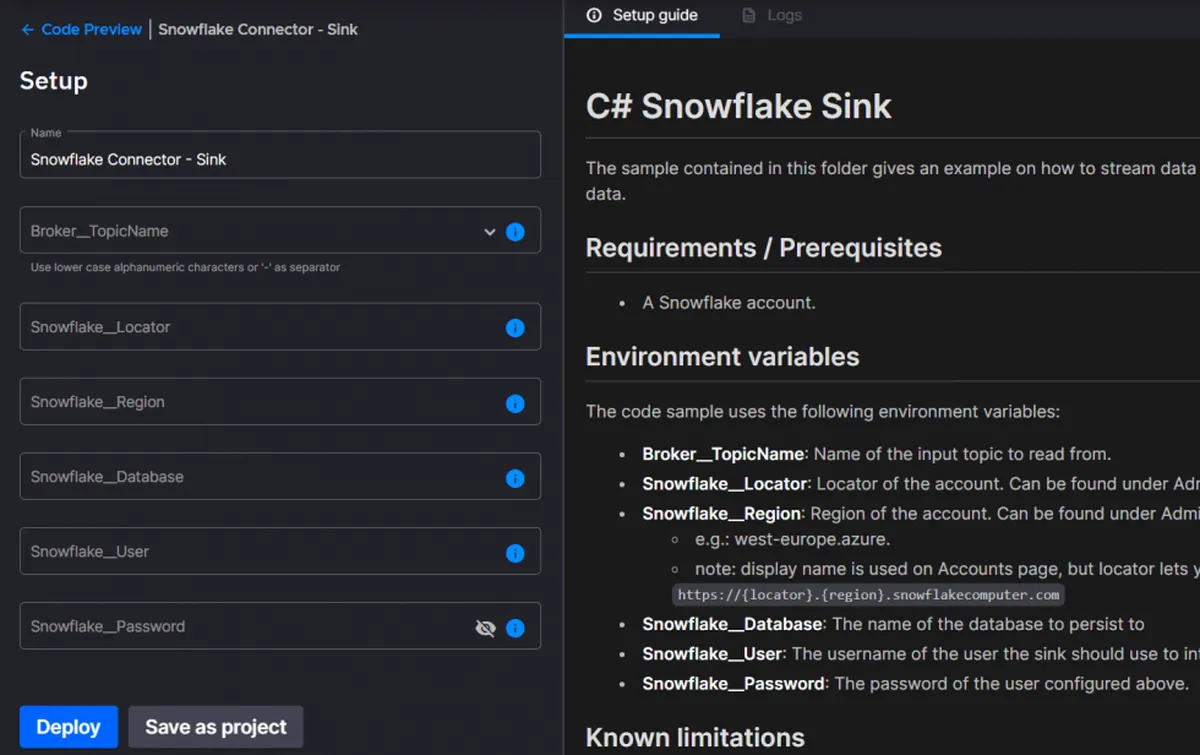
To fill in the Snowflake locator and region (these are similar to a unique ID for your Snowflake instance), navigate to your Snowflake account. Copy the locator and region from the URL and paste them into the corresponding fields in the connector setup in Quix. Lastly, input your username and password.
Click “Deploy” on the Snowflake connector. If the credentials and connection details are correct, you’ll see the “Connected” status in the log and will be redirected to your workspace.
You can see that your transformed data is arriving in your database by going to your Snowflake dashboard and refreshing the page and expanding the tree view under your database. You should see all of your tables populated in this list. You’ll see event values, parameter values and metadata all populated by the Snowflake connector in Quix. Look for the sentiment score in the “parametervalues” table.
Setting sights on more extensive projects
Congratulations! You built a no-code pipeline that filters and collects data from Twitter, transforms it with a HuggingFace model and delivers it to a Snowflake database.
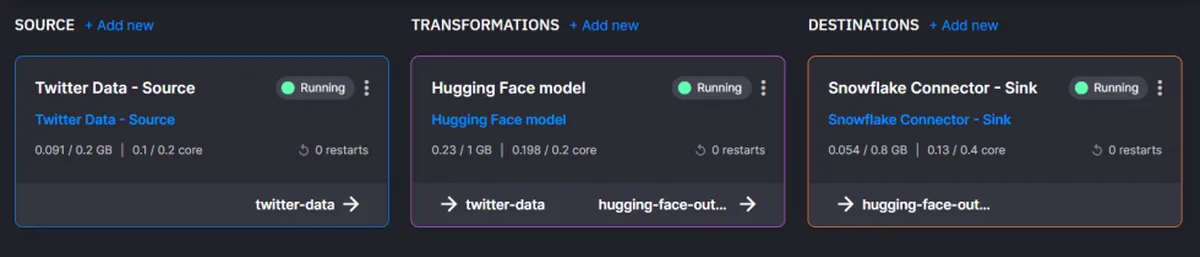
It’s easy to expand this example, thanks to the microservice approach used. Switch out sources, transformations and destinations or customize the ones you already have. The only thing left to say is that you can create your own Quix account if you want to try this for yourself.
What’s a Rich Text element?
The rich text element allows you to create and format headings, paragraphs, blockquotes, images, and video all in one place instead of having to add and format them individually. Just double-click and easily create content.
Static and dynamic content editing
A rich text element can be used with static or dynamic content. For static content, just drop it into any page and begin editing. For dynamic content, add a rich text field to any collection and then connect a rich text element to that field in the settings panel. Voila!
How to customize formatting for each rich text
Headings, paragraphs, blockquotes, figures, images, and figure captions can all be styled after a class is added to the rich text element using the "When inside of" nested selector system.
Steve Rosam is the Head of Content at Quix, where he oversees the creation and maintenance of content for publication both in-house and externally. With a background in software development spanning two decades, Steve has experience in a variety of industries including automotive, finance, media, and security. His technical expertise now fuels his leadership in content strategy and development at Quix.
Check out the repo
Our Python client library is open source, and brings DataFrames and the Python ecosystem to stream processing.
Interested in Quix Cloud?
Take a look around and explore the features of our platform.
Interested in Quix Cloud?
Take a look around and explore the features of our platform.