Build a simple event-driven system to get ML predictions with Python and Apache Kafka
Use the Quix Streams Python library to continuously stream email records from a CSV file, get an ML inference for each record, then stream the results back to a new Kafka topic.
About this tutorial
If you’ve ever interacted with ML models in the cloud, you might notice that it’s often done through a REST API (the GPT-3 API is currently a popular example). However, a REST API usually isn’t the best choice when working with high-volumes or continuous streams of data. Most of the time, it’s better to use an event-based system such as Apache Kafka. We’ll look at the theory behind this in a moment, but you’ll understand it faster if you try it out for yourself. We’ve created a simple tutorial to show you how to generate real-time ML predictions using Apache Kafka to manage the flow of data.
What you’ll learn
- How to stream raw data to Kafka from a CSV
- How to read the data from Kafka and send it to an ML model for inference
- How to output the inference results back into Kafka for downstream processing
What you should know already
This article is intended for data scientists and engineers, so we’re assuming the following things about you:
You know your way around Python and have worked with the Pandas library
You’ve heard of Apache Kafka and know roughly what it’s for
But don't worry if you don’t meet these criteria. You can always refer to the Kafka documentation for more details on any concepts or features. Plus, this tutorial is simple enough to follow along, and we’ll briefly explain these technologies. Just be aware that it’s not intended for absolute beginners.
What You’ll be building
In effect, you’ll create a system on your local machine that resembles the following architecture:
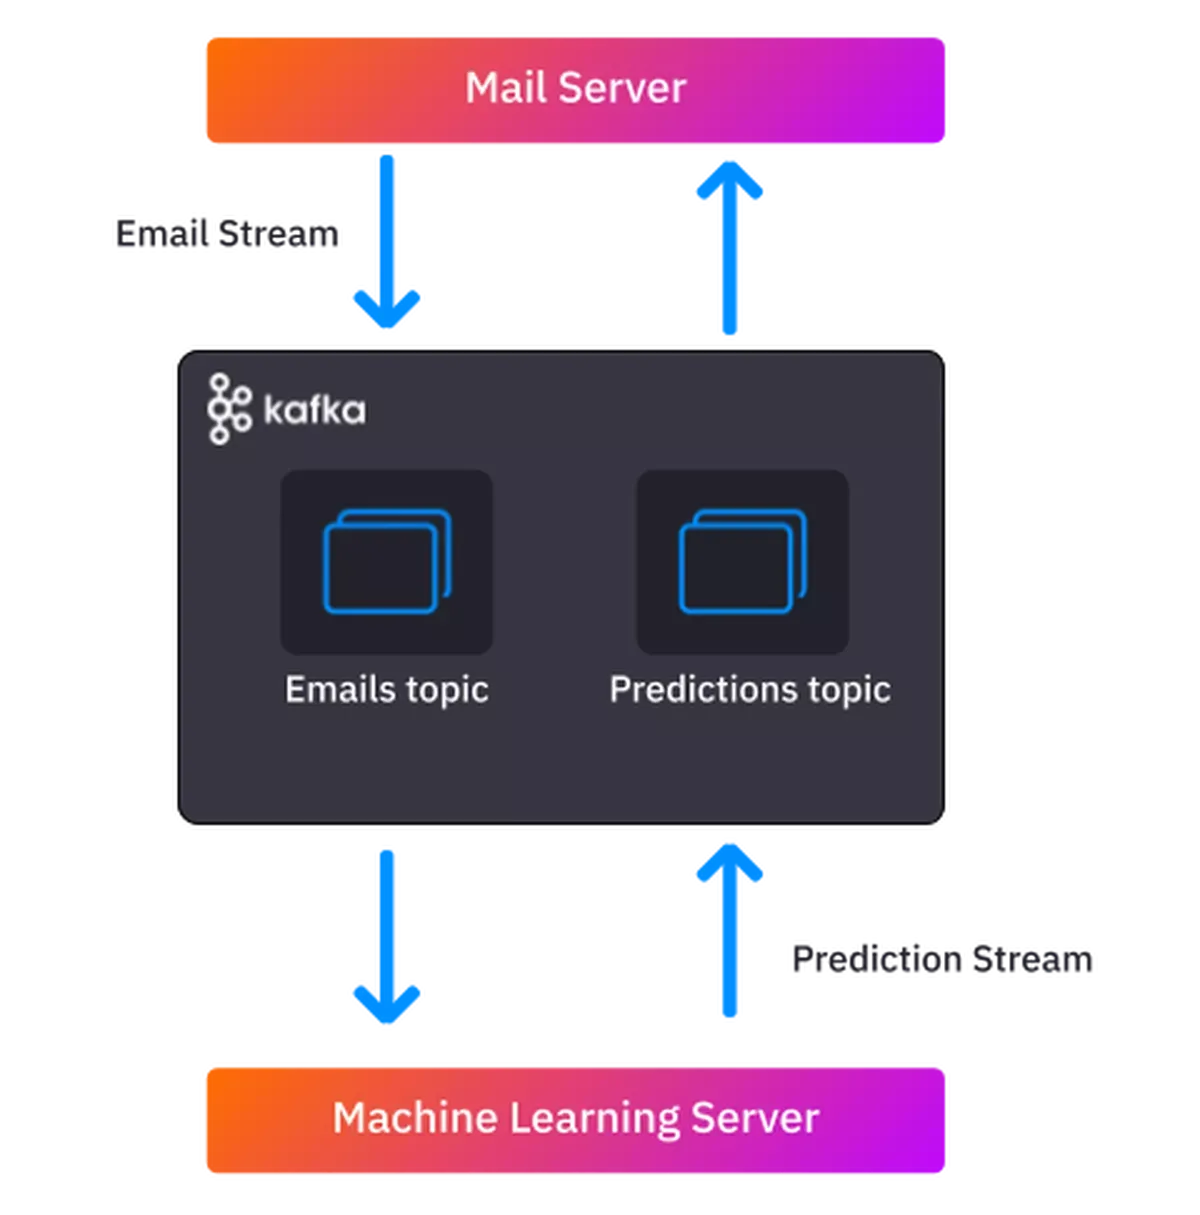
In this architecture, an email server is interacting with a machine learning server to get spam predictions. Kafka is in the middle managing the data flow.
The email server sends a stream of emails to the ML server via Kafka
For each email, the ML server returns a prediction about whether the email is spam or “ham” (a normal email)
It sends the predictions back to the email server, also via Kafka
The mail server can then update the spam label in its email database
Now, if you want to get straight to the tutorial you can skip the preamble, but we thought it might be useful to explain why we think Kafka is a great tool for ML and Python development.
Why Use Kafka to orchestrate data for ML predictions?
Because it’s generally more efficient and fault-tolerant. Pipelines like the one in our example usually have multiple processing steps that run at different speeds. This means that the underlying system needs to be efficient at queuing the data that is waiting for the next step. If one part of the pipeline is “clogged”, the whole system should be able to adapt gracefully. This is a challenge that Kafka handles much better than a system based on REST APIs
For example, suppose that your ML server chokes because there was a memory leak. What would happen?
How a REST-based system would react
In a REST-based system, the mail server will keep calling the ML server, asking “Hey, is this email spam or what?.. you there? ….please answer!”. But the mail server will keep getting the equivalent of an engaged dial tone. This ties up the mail server’s resources because it must keep trying until it gets an answer. For each email, it tries for a while, gives up, then moves on the next email. This means that many spam emails will slip through unfiltered until the ML service is back online.
How a Kafka-based system would react
Kafka, on the other hand, patiently stores all the emails it has received, accumulating a backlog of work for the dormant ML server. As soon as the ML server comes back online, the server has a stack of unfinished paperwork on its desk (metaphorically speaking). It must give predictions for the backlog of unprocessed emails before it can start working on the latest ones. And as far as the mail server is concerned, it’s business as usual. It waits for the ML server to hand over its predictions rather than having to repeatedly ask for them. Whenever it receives a new prediction, it updates its database. Granted, the backlog means that it may take longer for an email to be marked as spam than usual, but it’s better than spam not being identified at all. Kafka’s scalable architecture also enables you to give more resources to your ML service and get through the backlog faster.
Why use Python with Apache Kafka?
Because data and ML teams are generally more proficient in Python. They sometimes struggle with Kafka because most older Kafka tutorials are written for software engineers who write in Java. This is because software engineers have traditionally built the components that interact with Kafka (and Kafka itself is written in Java/Scala).
Kafka’s user base is changing however. The responsibilities of software and data teams are beginning to converge. This has been driven by the growing importance of data in modern organizations and the increasing complexity of data management and processing tasks. Today, data professionals also contribute to software components that interact with Kafka—but they still encounter a lot of friction because Java is generally not part of their skillset. That’s why we’re using Python in these examples.
Ok, that’s it for the preamble - let's get into the tutorial.
Prerequisites for this tutorial
You'll need about 30 minutes to complete the steps (once you have the required software installed).
Make sure that you have the following software installed before you proceed any further.
Major steps
Before we get into the details, let’s go over the major steps that we’ll be covering.
- Setting up Kafka: We’ll first get to grips with Kafka’s command line tools, and use them to:
— Start the Zookeeper and Kafka server.
— Create a topic (where we’ll be sending our data).
- Sending the raw email data to a kafka topic for downstream analysis: Use the Quix Streams Python library to:
— Read the csv into a DataFrame and initialize the kafka python producer.
— Iterate through the rows and send to Kafka.
We’ll also look at the benefits of using data frames and time series data with Kafka.
- Reading each email from a Kafka topic using an ML Model to determine if it’s spam: You’ll be using the Quix Streams Python library to chain together a consumer and producer and:
— Load a pre-trained model with Keras and TensorFlow
— Read the messages from our “emails” Kafka topic, and output a spam prediction
- Writing the spam predictions to another Kafka topic For downstread consumption: You’ll write the predictions to a “predictions” topic and look at how downstream processes could use that information.
If you want to jump straight ahead to the code, you can clone the tutorials repo in GitHub with the following command:
You'll find the code in the 'ml-predictions-kafka' subfolder.
Using Kafka to orchestrate data for ML predictions
Ok, so you’ve installed the prerequisites, know the steps, and are ready to go—let’s get this done!
Setting up Kafka
Before you can do anything with Kafka, you have to start the core services. Each of these services needs to run in a separate terminal window.
When following these instructions, start each terminal window in the directory where you extracted Kafka (for example “C:\Users\demo\Downloads\kafka_2.13-3.3.1\”)
1. Start up your Kafka servers:
— In the Kafka directory, open a terminal window and enter the following command.
- Linux / macOS
- Windows
You should see a bunch of log messages indicating the server started successfully. Leave the window open.
— Open a second terminal window and enter the following command:
- Linux / macOS
- Windows
Again, you should see a bunch of log messages indicating the server started successfully and connected to the Zookeeper server. Also leave this window open.
Downloading the data
For this exercise, you’ll be using an adapted version of this sample email data set from Kaggle that was designed for testing spam detection algorithms. I've adapted it so that it more closely resembles real-life time series data, with a timestamp and a unique identifier as well as the message body.
Here's a sample of the first few rows.
To prepare the data, follow these steps:
- Create a folder for this project (e.g. “kafka-ml-tutorial”) and download the “spam-timeseries.csv” file from our GitHub repo into the project folder.
- If you’re on a Linux-based OS, you can perform these steps with the following commands:
Creating a Kafka producer to send the email text
Now, start sending data to Kafka. You’ll be using the recently-released Quix Streams Python library which is one of several libraries intended to connect python applications to Kafka (others are kafka-python and confluent-kafka-python). I've chosen the Quix Streams library because it specializes in time-series data and has built-in support for Pandas DataFrames.
To create the Kafka producer, follow these steps:
1. Create a file called producer.py in your project directory and insert the following code block:
- This imports all the required libraries and initializes the Quix Streams, telling it to connect to the server that you should (hopefully) still have running on your computer under ‘localhost’.
- It also creates a Kafka producer to write to a new topic called ‘emails’ (fortunately, you don’t have to create this topic in advance, the library will create it for you).
- Finally, it reads in the CSV file as a DataFrame.
2. Add the ‘for’ loop that will iterate through the file and send each row to the producer for serialization and stream it into the topic “emails”.
3. Run producer.py with the following command:
For each message, you should see a DataFrame printed to the console in markdown format like this:
Loading the Model
Next, you'll use a pretrained model to collect the preprocessed data from the emails Kafka topic and create predictions with it. This model can be stored in a cloud bucket or alternate data store; however, since you are working locally, you can store it in your project directory.
To prepare, follow these steps:
Download the model archive file from this storage location and extract it into your project folder.
If you’re on a Linux-based OS, you can use a command such as the following:
To load the model:
- In your project directory, create a file called predictions.py and insert the following code block:
This imports all the required libraries, including the TensorFlow components which you’ll use to load the model into and interact with it. The first line then loads the model files into memory from the “model” subdirectory.
Creating a consumer and producer to manage data flow
In the same file, continue by adding the Kafka-related functions.
To read the email data and output spam predictions, follow these steps:
1. Add the code that initializes a consumer and another producer.
— Insert the following code into the predictions.py file, underneath the line that loads the model.
For the consumer, we’ve added some settings to make testing easier:
- AutoOffsetReset.Earliest—ensures that the consumer keeps reading from the earliest unread message in the topic.
- enable_auto_commit=False—ensures that the consumer keeps reading the same messages, regardless of whether it has already seen them.
2. Add the ‘for’ loop that will iterate through all the messages from the “emails” topic:
— Insert the following code into the predictions.py file (underneath the producer code) to get a spam prediction for each email and send the prediction to a “predictions” topic.
3. Now it’s time to test the code—run the predictions.py file with the following command:
You should see console output that resembles the following example:
You’ll see some messages labeled as 1 (spam) and others as 0 (ham).
As the predictions component is subscribed to the emails topic, it will keep making predictions until it has run through all the available emails. If you keep sending messages to the emails topic, this process can run continuously.
That’s it for now. Kudos for making it this far!
If you’re feeling extra adventurous, you could create an extra consumer.py file and write a consumer to read the spam predictions back into a Data Frame (by adapting the consumer code from this step) and finally into a new CSV.
Now, let’s go through what you did and how it might scale in production.
Wrapping up
First, let's revisit the production architecture that we illustrated at the beginning of this article.
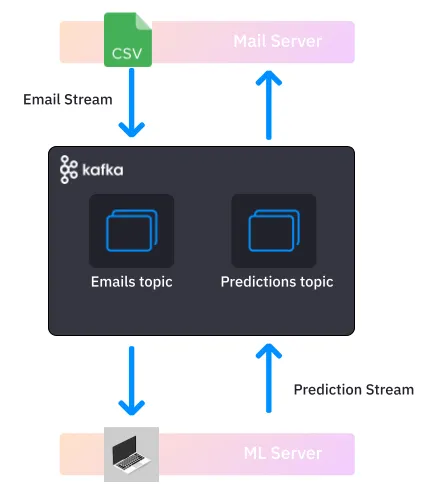
In this tutorial you essentially:
- Used a CSV to replicate a mail server and streamed emails to Kafka with the Quix Streams library.
- Ran a Kafka server on your local machine
- Ran a ML model on your machine to imitate an ML service and stream predictions back into another Kafka topic.
Of course, I should qualify that this local demo isn't truly "event-driven". The emails aren't arriving in a realistic fashion so we can't think of each incoming Kafka message as an "email received" event. But it gets you close enough.
How it could scale:
The mail server would of course be running on its own bare-metal or virtual server, and would be streaming mails continuously, perhaps in batches rather than one message at a time.
Kafka itself might be running in a virtual private cloud so that it can scale up and down as needed.
The ML service might be running in a consumer group in multiple replicas that it can also automatically scale up during spikes in demand.
Given all of this horizontal scaling, you would also need some extra Kafka configuration so that messages are processed in an optimal manner, using the full breadth of these horizontally scaled resources.
But that’s enough theory for now. Congratulations on making your first steps towards mastering Apache Kafka with Python. By following the steps outlined in this article, you should now have a good understanding of how to use Kafka to stream data from various sources, process that data, and pipe it through a machine learning model.
Remember, the key to successfully using Kafka for machine learning is to carefully plan your data pipeline and to test and monitor your system as you go. With practice and patience, you will become more and more proficient at using Kafka to power your machine learning projects.
If you have any questions about the tutorial, don't hesitate to reach out to me in The Stream—our open Slack community for real-time data enthusiasts.
- You can find the data used and example code in this GitHub repository.

Check out the repo
Our Python client library is open source, and brings DataFrames and the Python ecosystem to stream processing.
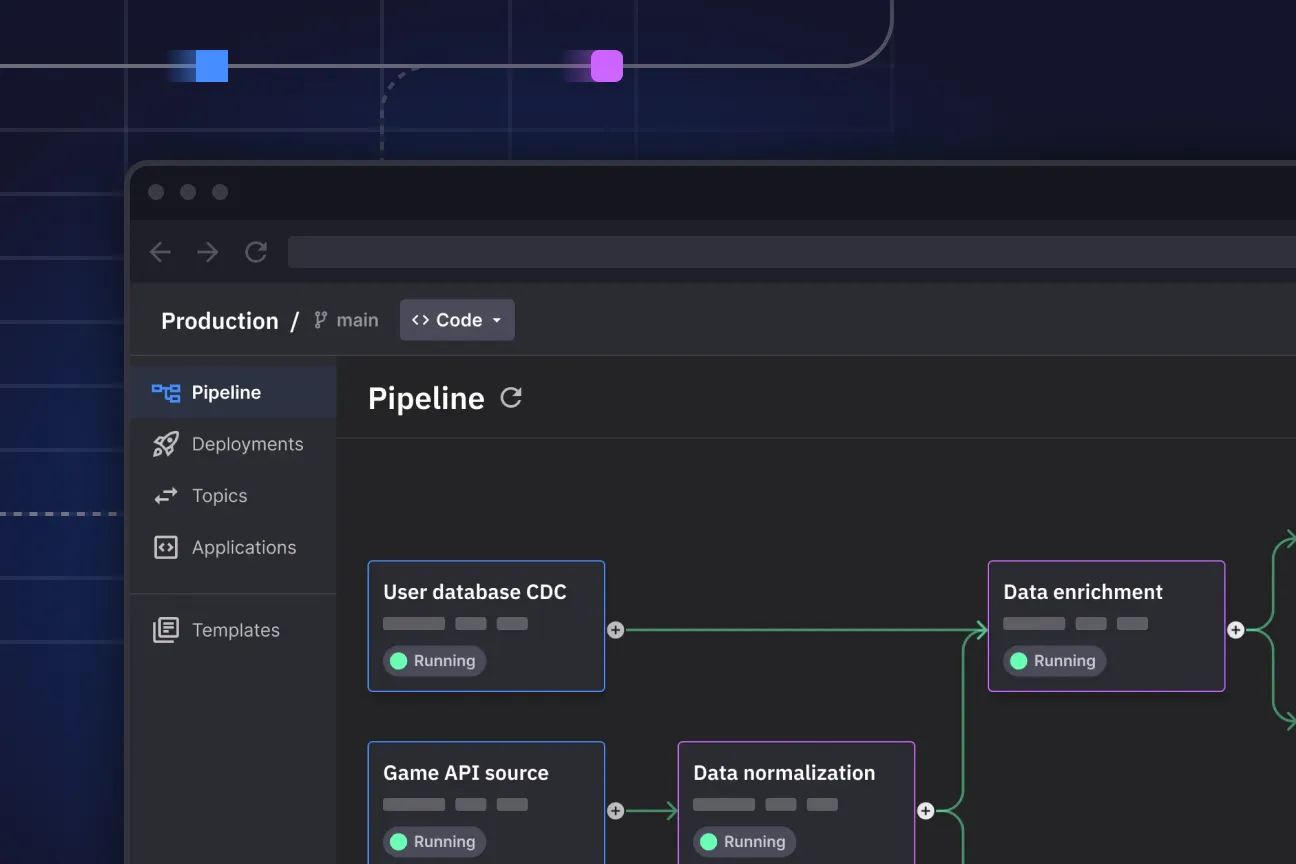
Interested in Quix Cloud?
Take a look around and explore the features of our platform.
Interested in Quix Cloud?
Take a look around and explore the features of our platform.

.svg)


